Strategy of Robot - How it Works
Definition
3dpips trade based on Triangular Arbitrage. Triangular arbitrage (also referred to as cross currency arbitrage or three-point arbitrage) is the act of exploiting an arbitrage opportunity resulting from a pricing discrepancy among three different currencies in the foreign exchange market. A triangular arbitrage strategy involves three trades, exchanging the initial currency for a second, the second currency for a third, and the third currency for the initial. During the second trade, the arbitrageur locks in a zero-risk profit from the discrepancy that exists when the market cross exchange rate is not aligned with the implicit cross exchange rate. A profitable trade is only possible if there exist market imperfections.
Strategy
Triangular arbitrage opportunities may only exist when a quoted exchange rate is not equal to the market's implicit cross exchange rate. The following equation represents the calculation of an implicit cross exchange rate, the exchange rate one would expect in the market as implied from the ratio of two currencies other than the base currency.
Consider a,b,c are currencies, thus :
Rate(a/c) = Rate(a/b) * Rate(b/c)
where
Rate(a/c) is the implicit cross exchange rate for currency c in terms of currency a
Rate(a/b) is the quoted market cross exchange rate for b in terms of currency a
Rate(b/c) is the quoted market cross exchange rate for c in terms of currency b
If the market cross exchange rate quoted by a bank is equal to the implicit cross exchange rate as implied from the exchange rates of other currencies, then a no-arbitrage condition is sustained. However, if an inequality exists between the market cross exchange rate, Rate(a/c) , and the implicit cross exchange rate, Rate(a/b) * Rate(b/c) , then there exists an opportunity for arbitrage profits on the difference between the two exchange rates.
An Example
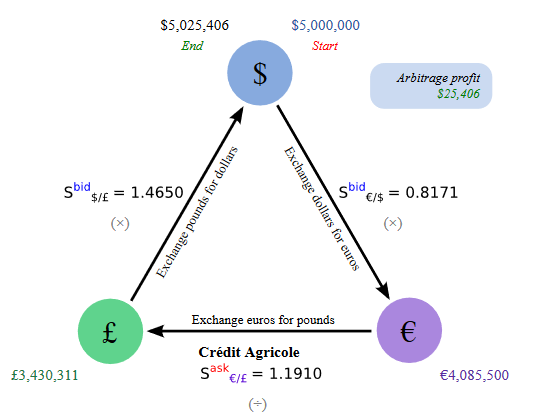
For example, a broker is quoting dollars at a bid price of 0.8171 €/$, and pounds at a bid price of 1.4650 $/£ and quoting pounds at ask price of 1.1910 €/£ . While the quoted market cross exchange rate is 1.1910 €/£, trader realizes that the implicit cross exchange rate is 1.1971 €/£ (by calculating 1.4650 × 0.8171 = 1.1971). Although the market suggests the implicit cross exchange rate should be 1.1971 euros per pound, Market is selling pounds at a lower price of 1.1910 euros. Trader can hastily exercise triangular arbitrage by exchanging dollars for euros, then exchanging euros for pounds, and finally exchanging pounds for dollars. The following steps illustrate the triangular arbitrage transaction.
1. Trader sells $5,000,000 for euros, receiving €4,085,500. ($5,000,000 × 0.8171 €/$ = €4,085,500)
2. Trader sells €4,085,500 for pounds, receiving £3,430,311. (€4,085,500 ÷ 1.1910 €/£ = £3,430,311)
3. Trader sells £3,430,311 to for dollars, receiving $5,025,406. (£3,430,311 × 1.4650 $/£ = $5,025,406)
4. Trader ultimately earns an arbitrage profit of $25,406 on the $5,000,000 of capital it used to execute the strategy.
3dpips Simple view to the strategy
For exchanging currency a to c, there are two methods :
1. Directly exchange a to c
2. Exchange a to b and then exchange again b to c
The above methods normally give same results. But in some market conditions there are differences (in range of some points). 3dpips wait for such conditions and enter trades. For example if method 2 is cheaper, first exchange with method 2 and then immediately reverse exchange with method 1.
Trading Pairs
3dpips trade on 56 triangular combination of pairs as below : (Note that this is all possible combinations on 28 major and cross Forex Pairs.)
| Index | Pair 1 | Pair 2 | Pair 3 |
|---|---|---|---|
| 1 | AUDCAD | CADJPY | AUDJPY |
| 2 | AUDCAD | CADCHF | AUDCHF |
| 3 | AUDUSD | USDCAD | AUDCAD |
| 4 | AUDUSD | USDCHF | AUDCHF |
| 5 | AUDUSD | USDJPY | AUDJPY |
| 6 | EURCAD | CADJPY | EURJPY |
| 7 | EURCAD | CADCHF | EURCHF |
| 8 | EURCHF | CHFJPY | EURJPY |
| 9 | EURGBP | GBPUSD | EURUSD |
| 10 | EURGBP | GBPCAD | EURCAD |
| 11 | EURGBP | GBPCHF | EURCHF |
| 12 | EURGBP | GBPAUD | EURAUD |
| 13 | EURGBP | GBPJPY | EURJPY |
| 14 | EURGBP | GBPNZD | EURNZD |
| 15 | EURUSD | USDCAD | EURCAD |
| 16 | EURUSD | USDCHF | EURCHF |
| 17 | EURUSD | USDJPY | EURJPY |
| 18 | GBPUSD | USDCAD | GBPCAD |
| 19 | GBPUSD | USDCHF | GBPCHF |
| 20 | GBPUSD | USDJPY | GBPJPY |
| 21 | NZDUSD | USDCAD | NZDCAD |
| 22 | NZDUSD | USDCHF | NZDCHF |
| 23 | NZDUSD | USDJPY | NZDJPY |
| 24 | USDCAD | CADJPY | USDJPY |
| 25 | USDCAD | CADCHF | USDCHF |
| 26 | USDCHF | CHFJPY | USDJPY |
| 27 | GBPCAD | CADJPY | GBPJPY |
| 28 | GBPCAD | CADCHF | GBPCHF |
| 29 | GBPCHF | CHFJPY | GBPJPY |
| 30 | EURAUD | AUDCAD | EURCAD |
| 31 | EURAUD | AUDJPY | EURJPY |
| 32 | EURAUD | AUDUSD | EURUSD |
| 33 | EURAUD | AUDCHF | EURCHF |
| 34 | EURAUD | AUDNZD | EURNZD |
| 35 | GBPAUD | AUDCAD | GBPCAD |
| 36 | GBPAUD | AUDJPY | GBPJPY |
| 37 | GBPAUD | AUDUSD | GBPUSD |
| 38 | GBPAUD | AUDCHF | GBPCHF |
| 39 | GBPAUD | AUDNZD | GBPNZD |
| 40 | AUDCHF | CHFJPY | AUDJPY |
| 41 | CADCHF | CHFJPY | CADJPY |
| 42 | EURNZD | NZDJPY | EURJPY |
| 43 | EURNZD | NZDUSD | EURUSD |
| 44 | EURNZD | NZDCAD | EURCAD |
| 45 | EURNZD | NZDCHF | EURCHF |
| 46 | GBPNZD | NZDJPY | GBPJPY |
| 47 | GBPNZD | NZDUSD | GBPUSD |
| 48 | GBPNZD | NZDCAD | GBPCAD |
| 49 | GBPNZD | NZDCHF | GBPCHF |
| 50 | NZDCAD | CADJPY | NZDJPY |
| 51 | NZDCAD | CADCHF | NZDCHF |
| 52 | NZDCHF | CHFJPY | NZDJPY |
| 53 | AUDNZD | NZDJPY | AUDJPY |
| 54 | AUDNZD | NZDUSD | AUDUSD |
| 55 | AUDNZD | NZDCAD | AUDCAD |
| 56 | AUDNZD | NZDCHF | AUDCHF |